3/15/2012

Pretty Peacock

Well I've started and have a definite plan... So far the head and neck is satin stitch with gold DMC.  Obviously the wing is beads and sequins and the back is couched cording.  The mini sequins in the wing were a gift from Susie Wolfe and they are the perfect color..

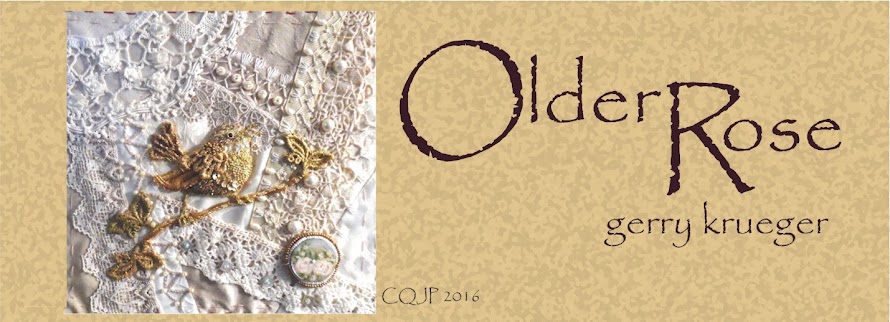
I am using my rustic gold cording and it is working just as I had hoped.. It is a little bulky but I think it will be fine when finished...  As usual I transferred my design to the BACK of the block and basted around it.  I usually use a fairly neutral color but I wanted it to show up in photos so I used a dark wine thread for the basting.

There are some specific goldwork techniques I want to try on this particular block...  The first is called "laid" work and a design is worked over stitching or cording.  I want to do it over the cording on the back of the peacock...


The next thing I want to try is "felt padding" which will give a raised look to the tail feathers.  Some of the goldwork I've seen in books cover the padding with a kid leather but I will be trying several things from my stash of cheap stuff.

Cathy L. had a pertinent comment on the last post:

"Aha...good technique if you are good with paper and pencil...what about if you can't draw at all...not even a good stick figure?"

My reply to her was not to use the paper and pencil step.  Just play with paper cutouts until you find something you like that fits you space...clean it up a bit and use it...  No drawing necessary.  Often that is the last step for me also...

4 comments:

Wendy said...

I can hardly wait for this to develop. Not only that but I am learning so much from your sharing ideas and how you do things on blocks. Thank you for sharing all your secrets with us. So inspiring!

Arlene White said...

Hi Gerry,

Can't wait to see your finished bird, this is a wonderful RR, thanks for organising it.

Regarding the felt padding:
I was taught to place my smallest piece of the padding felt down first and stitch the poles, just a small tacking stitch, not ones going across the felt. Then continue to add larger pieces, stitching the poles and then the smaller sections between them. It gives you a nice even surface at the end to cover.

Arlene
http://arlenes-crafts.blogspot.com.au/

Marilyn said...

Wow, he's looking gorgeous already. And he would also look spectacular in real peacock colours. I hope you do that one soon too.

Marilyn said...

He's gorgeous already. I can't wait to see him done. And he'd be really gorgeous in real peacock colours too. I will wait anxiously until you do him that way too

Related Posts Plugin for WordPress, Blogger...

Popular Posts